Showing posts with label tutorial. Show all posts

Thursday, February 20, 2014

*Tutorial* Make your own Oilcloth Washi Tape Fabric

 
 I'm fascinated by Washi Tape...
All the fantastic designs and colors really speak to my creative mind.
It's so much fun and so easy to use, that I have "Mod-Podged" it onto a variety of paper items to add some design and color.
Then, my "Hypernoodle" got to thinking how cool it would be to have a fabric version of these wonderful little tapes!  If you're familiar with washi tape, you know that the feel of it is not very "tape-like" (in the traditional tape kind of way)  As I was unrolling it, I noticed that to me, it is kind of, sort of "fabric-y".
Awhile back, I discovered a crafting medium from Martha Stewart called "Fabric to Fabric Durable Oilcloth Finish".  This genius medium is much like Mod Podge, but is specially formulated to create an Oilcloth finish when applied to fabric.  So I made some Washi-Tape fabric and you can too with this easy tutorial!

Items needed:
-Martha Stewart Fabric-to-Fabric Durable Oilcloth Finish Medium
(A number of places online sell this, but I found it at Michaels Craft Store)
-Your Washi Tape selections in the desired patterns
-Cotton background fabric (I used solid white, it provides a nice clean background)
-Craft Squeegee.  Martha Stewart offers a nice one (also purchased from Michaels)
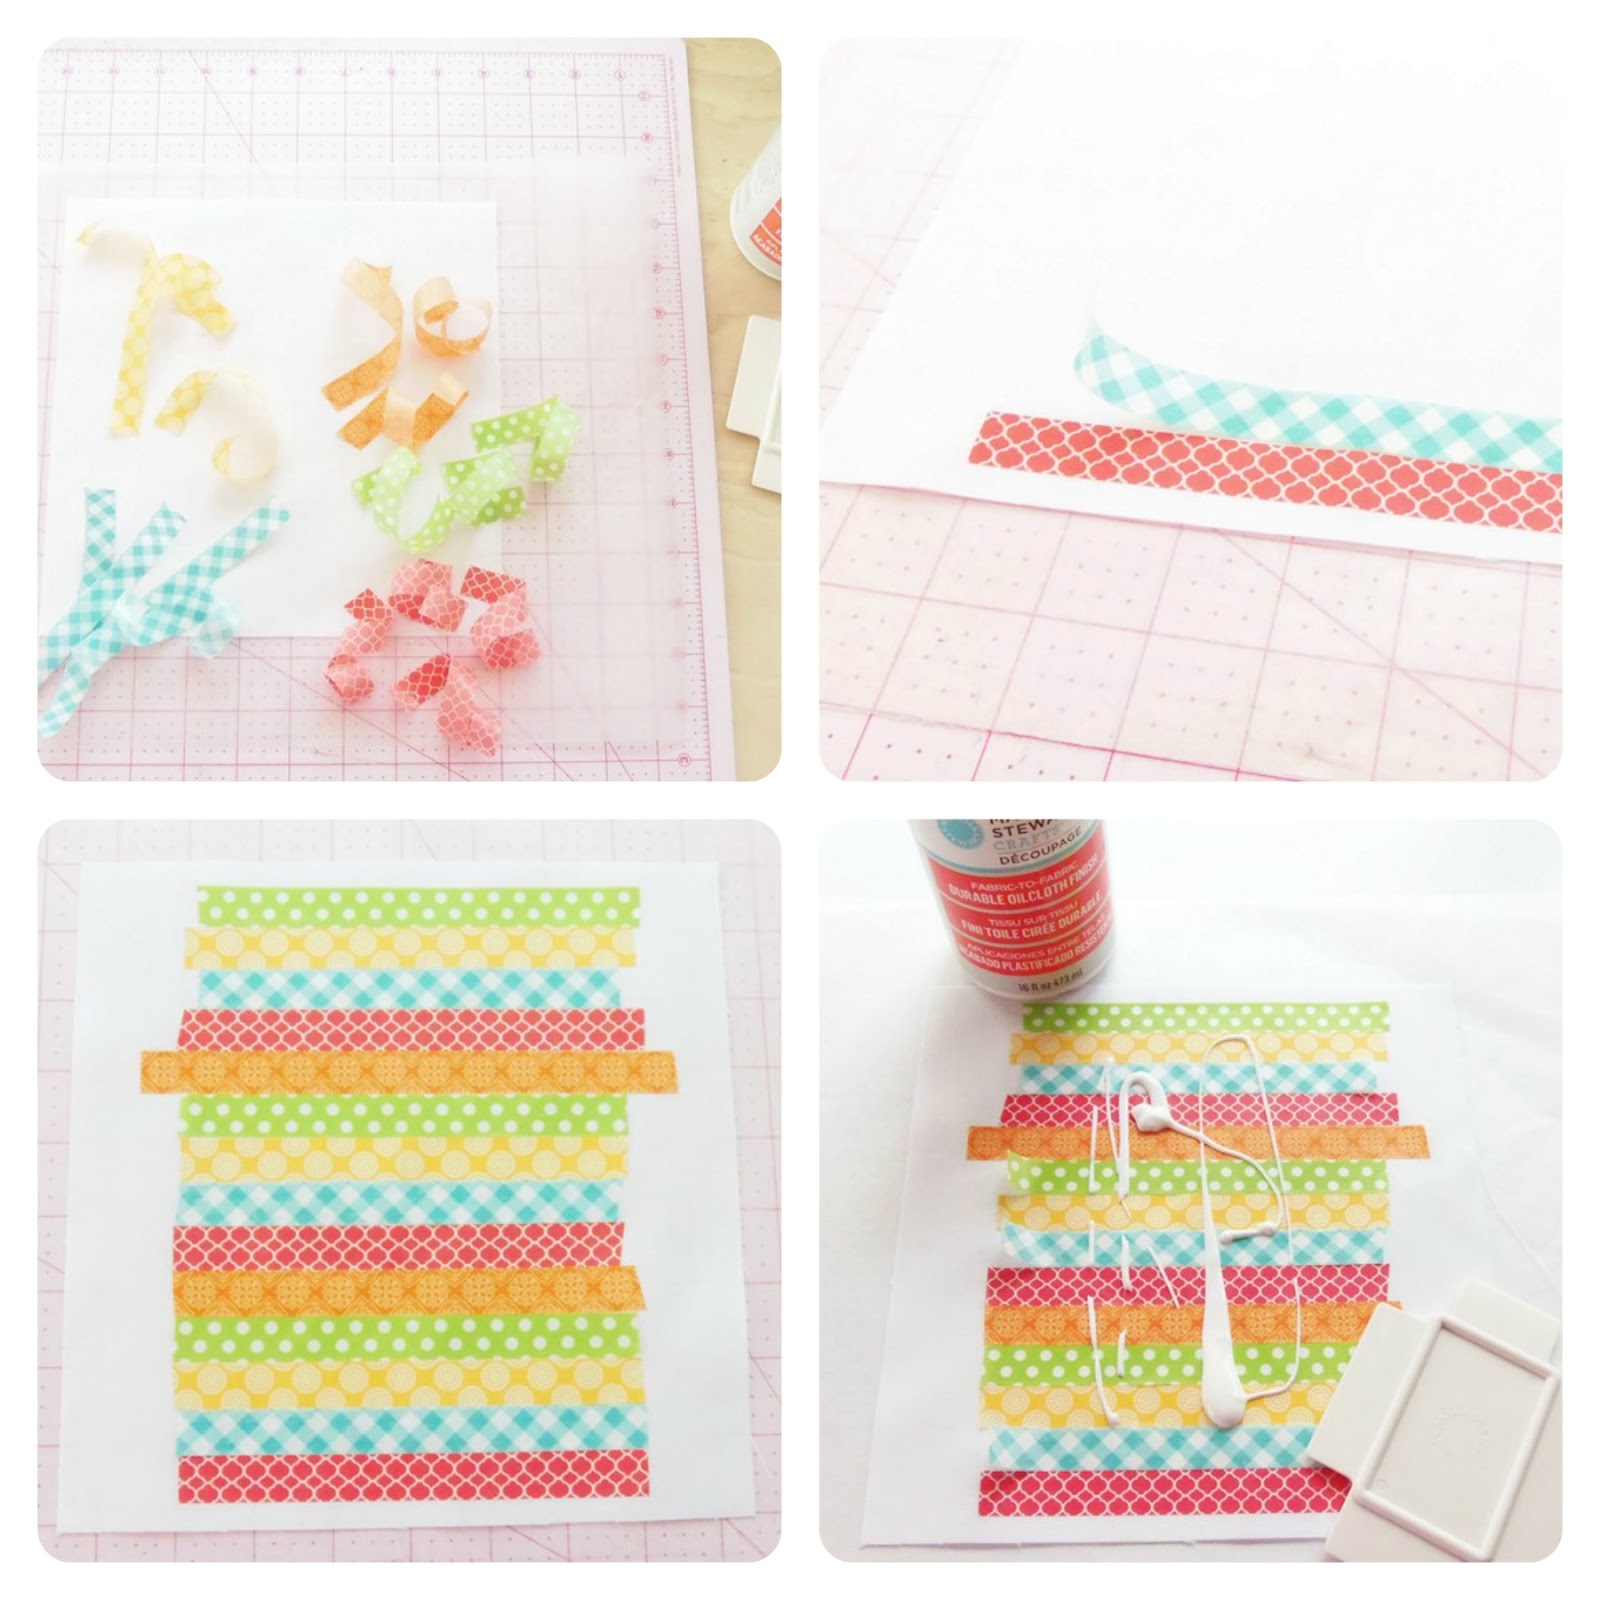
 •Cut your cotton background fabric to your desired size.  Make sure you leave a little extra on the top, bottom and sides from the length and height of your washi tape pattern for the medium to run over.  I cut mine fabric to a 9x8" rectangle.  Cut your washi strips in your desired length.  I cut mine about 6.5" inches long.

•Apply your washi tape strips to your cotton fabric.  I did mine in nice even length-wide rows lining up each tape strip butted up even and close to the one below.  You can lay your rows from top to bottom or even in a criss-cross pattern!  Here's where your creativity can come through!

•When you're done applying the washi tape strips to your cotton fabric in your design, press them down again using the side of your thumb making sure all the tapes are adhered to your cotton fabric.

•Apply the Oilcloth medium right away~ 
(Don't do what I did and wait until the next day!  Some of your washi tape strips may loose some of their "stickiness" and won't stay adhered to your cotton fabric! See the pic!)  You may find that some brands of washi-tape may not adhere to your cotton as well as others anyway, even if you don't wait until the next day.  This is ok, you'll catch it when using the squeegee, but still try to apply the medium as soon as possible after you are done with your design.

•Using your squeegee, spread the medium over the fabric in nice even strokes following the manufacturer's instructions.  Pay special attention to the areas where your washi tape meets. Don't worry about thin "squeegee" lines on top of your fabric from the medium, they blend in when the medium dries. 
 
•The manufacturer's instructions say 2-3 coats total, but I found that 3-4 coats (letting each coat dry in-between for about 45 minutes) really helps the washi tape blend- into what looks like one piece. 

•When you're done applying your coats, let dry completely.  I left mine to dry overnight.  You'll then come back to a nice & dry, shiny, sleek, oilcloth finish!

•Almost done! Cut your excess cotton background fabric off~ If your outer edges will be exposed, make sure to treat them either with a thin coat of more of the Oilcloth Medium or with Fray check.
Now your Washi Tape fabric is ready to use!

I made this cute little pouch using my washi tape fabric!  
If you'd like to make one of these pouches with yours, simply cut out a rectangle, fold the bottom up to your desired pocket size and topstitch.  Then just fold the top flap down and apply a KAM snap! Cute and easy!

As with any oilcloth fabric, use a teflon foot on your sewing machine if you plan to sew it!
& please feel free to share any designs or projects you made with your washi tape fabric on my Facebook page! Hypernoodle Facebook

Have fun!
♥Hypernoodle

Tuesday, January 14, 2014

Tutorial ~ Subway Tile Pillow with Invisible Zipper


I love the look of Subway Tiles and decided to covert the look into a nifty pillow.  This pillow allows for easy peasy piecing ~  It's quick to make, you can whip one up in no time!  On top of that, it looks phenomenal finished and you can easily remove the pillow form to launder the pillow case!  No need for you to buy expensive commercial pillows (that everyone else has) when you can customize and make your own!

Your materials:
•5 FQ's of 5 different colored solid fabrics
•1 FQ for pillow backing (you can choose a solid or print for your pillow back)
•1 -20 inch pillow form
•1- 18 inch invisible zipper
•coordinating thread (I reccoment Aurifil 50wt thread--your seams will lay super flat and nice!) 
• and of course, your sewing machine!

*Note, I did not wash my fabrics prior to cutting/pressing.  If you do wash your fabrics, make sure to do so first.  You can still use FQ's for cutting your rectangles, but you will need a larger 5/8 yd piece of fabric for your pillow back to accommodate for shrinkage.


• Cut out our "Subway Tiles".  You will need 6 rectangles of each color.  Take your 5 solid Fat Quarters and cut 6 rectangles from each color--cut them to be 5 inches wide x 3.5 inches tall.  When you're done, you should have 30 rectangles. 

• From your Pillow backing fabric, cut out an 18"x18" square

• Layout your desired design.  You'll need 6 rows of 5 rectangles each.  You can layout your own design, or using the main pic of my subway tile pillow, follow my layout substituting your colors for mine in the same manner.

• Working from your rows, take two rectangles and lay them on top of each other with the RST (right sides together)


• Using a 1/4" seam allowance, stitch down one side of the short end (3.5" side) of the rectangle.  I've used a 1/4" foot on my machine.  It has a seam guide to make a nice 1/4" seam

• Take the two rectangles you've just sewn and open them up.  Add another rectangle on in the order of your row layout (make sure the fabrics are RST)
• continue stitching the short ends together until you have a row of 5 rectangles

• Use the same process for all your rows until you have 6 completed rows of 5 rectangles. (my pic only shows 4 rows, the last one was cut off--but you will need 5 rows) 

• Flip your rows over and press each seam open

• Make sure to PRESS using an "up and down" motion (don't iron, it may distort your seams/fabric)


 • Once you've pressed open the seams on all your rows, flip them over to the right side.  This is where your "Subway Tiles" start to take shape!
Starting with the top row and the second row, offset the second row to the MIDWAY point (the middle of the first rectangle on the second row will sit under the first seam of the top row)  


 • Alternate seams and midway points all the way across and pin or clip in place with the RST (this will require you to flip the top row on top of the second row)
Don't sweat this part! This midway-offsetting does NOT have to be super accurate, just eyeball your midway 

• Stitch along the edge you just pinned/clipped using a 1/4" seam

•  Continue adding on your rows noting the midway points.  Each row added will be offset at the beginning.


• Continue adding on your rows...

• Press open your new seams.  You can either wait until all rows are stitched together or do each one right after it is added on.  Again, make sure to PRESS using an up and down motion.

When you're done pressing seams...


Here's the back with all the seams pressed...


 and here's the front!  Now you can press and GENTLY iron this top piece.


• Now, lay your 18x18" pillow backing on top of your Subway Tile front.  

• Using the 18" square as a guide, cut your front to an 18" square.

• Again, don't sweat this part--you can line it up however you want~the "tile" effect will still come through!  I like mine a little wonky with little edges sticking out on the sides.

• Clip or pin the top and sides of the "tile" front and your back piece, RST


•Stitch along the sides and the top with a 1/4" seam allowance.  Don't stitch the bottom~leave it open.  This is where your invisible zipper will go.


•Grab you invisible zipper and flip it over.  Push open the zipper teeth on the top, separating them from the zipper tape.  Press/iron along the zipper (**Be careful not to leave your iron on the zipper teeth for too long as they may get very hot and could melt the teeth**)

•This is what your top zipper tape/teeth will look like when finished

•Push open the zipper teeth on the bottom, separating them from the zipper tape in the same manner and press/iron open


• Now take your zipper, completely open, and place it in between your front and back pillow fabrics --attach it to the back pillow fabric UPSIDE DOWN using clips.  (HINT-clips are MUCH easier for this part than pins!)  The zipper pull should be on the left side...

• Clip all the way across matching the outer edge of the zipper tape to the edge of the back pillow fabric. 

• If you have an invisible zipper foot and know how to use it, Hooray!!  Use it here!  if you don't...no worries!  You can use a regular zipper foot!  It is usually labeled with a letter "E" for most machines, but refer to the above pic if you're not sure.  If you can snap the foot to your machine's shank, do so, on the LEFT side of the zipper foot.  If the shank of your machine is different, attach your zipper foot according to the manufacturer's instructions.

• Place under your presser foot starting with the RIGHT side of the pillow.  Your zipper foot will sit atop your zipper tape.  IMPORTANT: Move your needle over to the left as close as possible to the zipper teeth


Stitch down the zipper tape getting as close as you can to the zipper pull on the other end

• Zipper is now attached to the back pillow fabric!

• Now flip your pillow over so the back fabric is facing you, and pin/clip the zipper to the front fabric the same way you did the other side (the zipper pull should now be on the right)

• This time, you will start on the end where the zipper pull is, so scoot your zipper foot as close to the zipper pull as possible under your presser foot--Also make sure again that your needle is as close to the zipper teeth as possible.  Stitch all the way down the zipper tape 


•Now that your invisible zip is attached to both the front and back of your pillow, it's time to close the corner zipper "gaps"
Note where your zipper stitching stops on both the left and right sides of your pillow.  You can eyeball it or mark it with a pencil.

•With your zipper foot still attached, place the left bottom of the pillow under your presser foot about 1/4" - 5/8" up from your zipper stitching

• Stitch out just beyond where your zipper stitching stops

• Do the same thing on the right side of the pillow bottom (SEE PICS)

• Clip with scissors or pinking shears all 4 of your pillow corners


• Almost done!  Turn your pillow right side out...

• Voila!

• Now just scrunch your pillow form into the zippered opening (the reason why I use a pillow form that is bigger than the pillow cover is so the pillow is full, using a smaller pillow form will make your pillow look sad and droopy!)


• Now just zip 'er up!  
Notice how stitching as close to the zipper teeth as possible made the zipper disappear? Nice!


You're Finished!  Now you can easily take out the pillow form to wash the outer pillow case anytime!  Enjoy your new pillow!

Happy Sewing!
 ♥Hypernoodle


Thursday, May 30, 2013

Learn to Sew with Amber at "Crazy Little Projects" Blog

 
I've had quite a few folks tell me they love using fabrics for crafts, but have no idea how to sew.  I get asked often to do tutorials & yes, they are coming soon! :)  But they will be awfully long having to explain some of the more fundamental steps.

So, Amber over at Crazy Little Projects has the perfect solution!  
A "LEARN TO SEW" series!  

This series is *perfect* for learning the basics so that you can begin sewing!  If you know the basics, you can conquer almost any online tutorial or project~including the ones coming from me!
Amber did an adult series earlier this year and now she is doing a 'kids & teens' series this summer starting June 12th.  BUT, here's the best part...adults can still participate in the kids series!  It will have the same fundamentals taught as the adult series!  Here's a peek at some of the projects you'll be able to learn how to do:
  
With lessons like: "Meet Your Machine" and "How to Sew a Straight Line", you can easily learn to sew!
Amber has even compiled a fantastic Sewing Dictionary to help you master sewing terminology!

I highly recommend Amber's Learn to Sew series if you are interested in learning to sew or brushing up your skills.

To help kick off the series, we're doing a GIVE-AWAY of a super cute bundle of kids fabrics straight from the Hypernoodle website!  Would you like to win this bundle?
Of course!
Head over to the CRAZY LITTLE PROJECTS blog and enter!  Be sure to follow Amber's blog and stay tuned for the start of this summer's "Learn to Sew" series!


Tuesday, November 20, 2012

Simple way to get all Pattern Sizes out of a purchased pattern

Howdy ya'll! ☺
I've had quite a few people ask me questions about numerous different sewing related subjects.  
I seriously need to get on the ball and start doing tutorials for these things (like I said I would many moons ago!)  Life always throws me a curve ball right when I get to it though!  I'm sure there are tons of you that know that being a wife, mother and business woman does not afford you much free time!
But, today...today is a different story!  I have set aside time before the dinner-making must begin for a quick and simple tutorial on getting all the Pattern sizes out of a purchased pattern!  This may not be any new information to Advanced Sewers, but I've had a bunch of newbies ask me this!

I don't tend to use patterns much, I like to design things and draft my own.  But I wanted to make slippers for some family members for Christmas and didn't have the time or brain cells to design one and then draft patterns for all the various sizes of everyone's feet.  So I purchased this pattern:
Kwik Sew "Snuggly Slippers"!  Super cute!
As you all know, when you open up a store bought pattern, this is what you get:
Ack!  Right?  I've actually had people who want to learn to sew tell me they are intimidated by patterns because they appear so confusing...   :(
If you look at the directions included with the pattern pieces, it will tell you which pieces you need to use for the item you'd like to make.  I am making "VIEW B" which is the photo on the top with the fuzzy green lining.  The directions will tell you which numbered pieces to use to create your project.  You only have to cut those out, not any of the other pieces.  
Now, when you look at the pattern, for the piece numbered "1", there are multiple sizes and they are all layered on top of each other.  If you wear a "SMALL" and you want to make those but your sister wears a "LARGE" and you also want to make those--how do you do that without sacrificing the other sizes?  If you cut out the "SMALL" pattern piece, the medium, large and extra large and pretty much destroyed.  And if you don't cut them out how will you transfer the pattern piece to the fabric???
Never fear!  We're going to make new pattern pieces and salvage the entire pattern!
You could get some pattern tracing paper and a wheel to transfer the pattern to the fabric, but most sewers don't like to do this...at least the ones I know!
You only need 2 things...first thing you will need is some wax paper:
you can find wax paper at your Grocery Store~very cheap too!
•Pull a piece of wax paper off your roll big enough to fit over the pattern piece you need
•Choose the size you'd like to make and using a Sharpie, trace around that size on the wax paper like so...
You can trace on the wax or non-wax side...I like to use wax paper because not only is it transparent enough that you can see right through it easily without having to use a light table, but the consistency of it is very similar to the actual pattern pieces (minus the wax of course!)  When you've traced the size you need,  remove the wax paper from the top of the pattern and you will have this:
Now you can simply cut around your wax paper and...Voila!  You have the size you need!  Make sure to transfer any information on the original pattern piece to your new wax pattern piece...most importantly the size!  Like so...
Here I'm doing the same tracing with the sole of the slipper
Repeat this tracing for all of the pattern pieces you need to complete your project.  Here are all my pieces traced and marked for a size "MEDIUM" slipper
Now I've got all new pattern pieces and my original pattern is still in tact so when I need to make a LARGE or a SMALL I can create new wax pattern pieces without cutting my original pattern.
If your original pattern piece is too big for the width of the wax paper you have, simply tape your wax paper together to form a piece big enough.
Like I mentioned, you could also use tracing paper and a tracing wheel to trace the pattern onto your fabric, but this can compromise the original pattern and cause it to rip or be filled with holes.  That's why I use the wax paper so my original pattern is never compromised.
As a side note, you could also use Freezer Paper instead of wax paper...the shiny side of FREEZER paper (not wax paper) can be ironed onto cottons and then you can cut right around it.  FREEZER paper is thicker than wax paper though and not transparent, so you will need a light table (or a window with good light coming through it as a 'light table') to cut out your new pattern pieces.  If you use FREEZER paper, make sure you trace on the NON shiny side.
After all that...here are one of the pairs of slippers I made:
The 1st ones I made were with cotton, but the were very "floppy" and not sturdy like good winter slippers should be.  So as I usually do, I switched it up--I used fleece and added an extra layer of batting in between the lining and the outer shell...it made them "meaty"!  Soft and plush with lots of warmth...
dontcha just love 'em?
© The Hyper Hub. Powered by