Friday, February 7, 2014

Giveaway time with Maureen Cracknell Handmade!

 
It's Giveaway time!  
There are few things better than bringing fabric happiness to people!  So, Hypernoodle's doin' a huge Giveaway with (in my opinion) one of the best Quilty bloggers around, Maureen Cracknell from Maureen Cracknell Handmade !
 
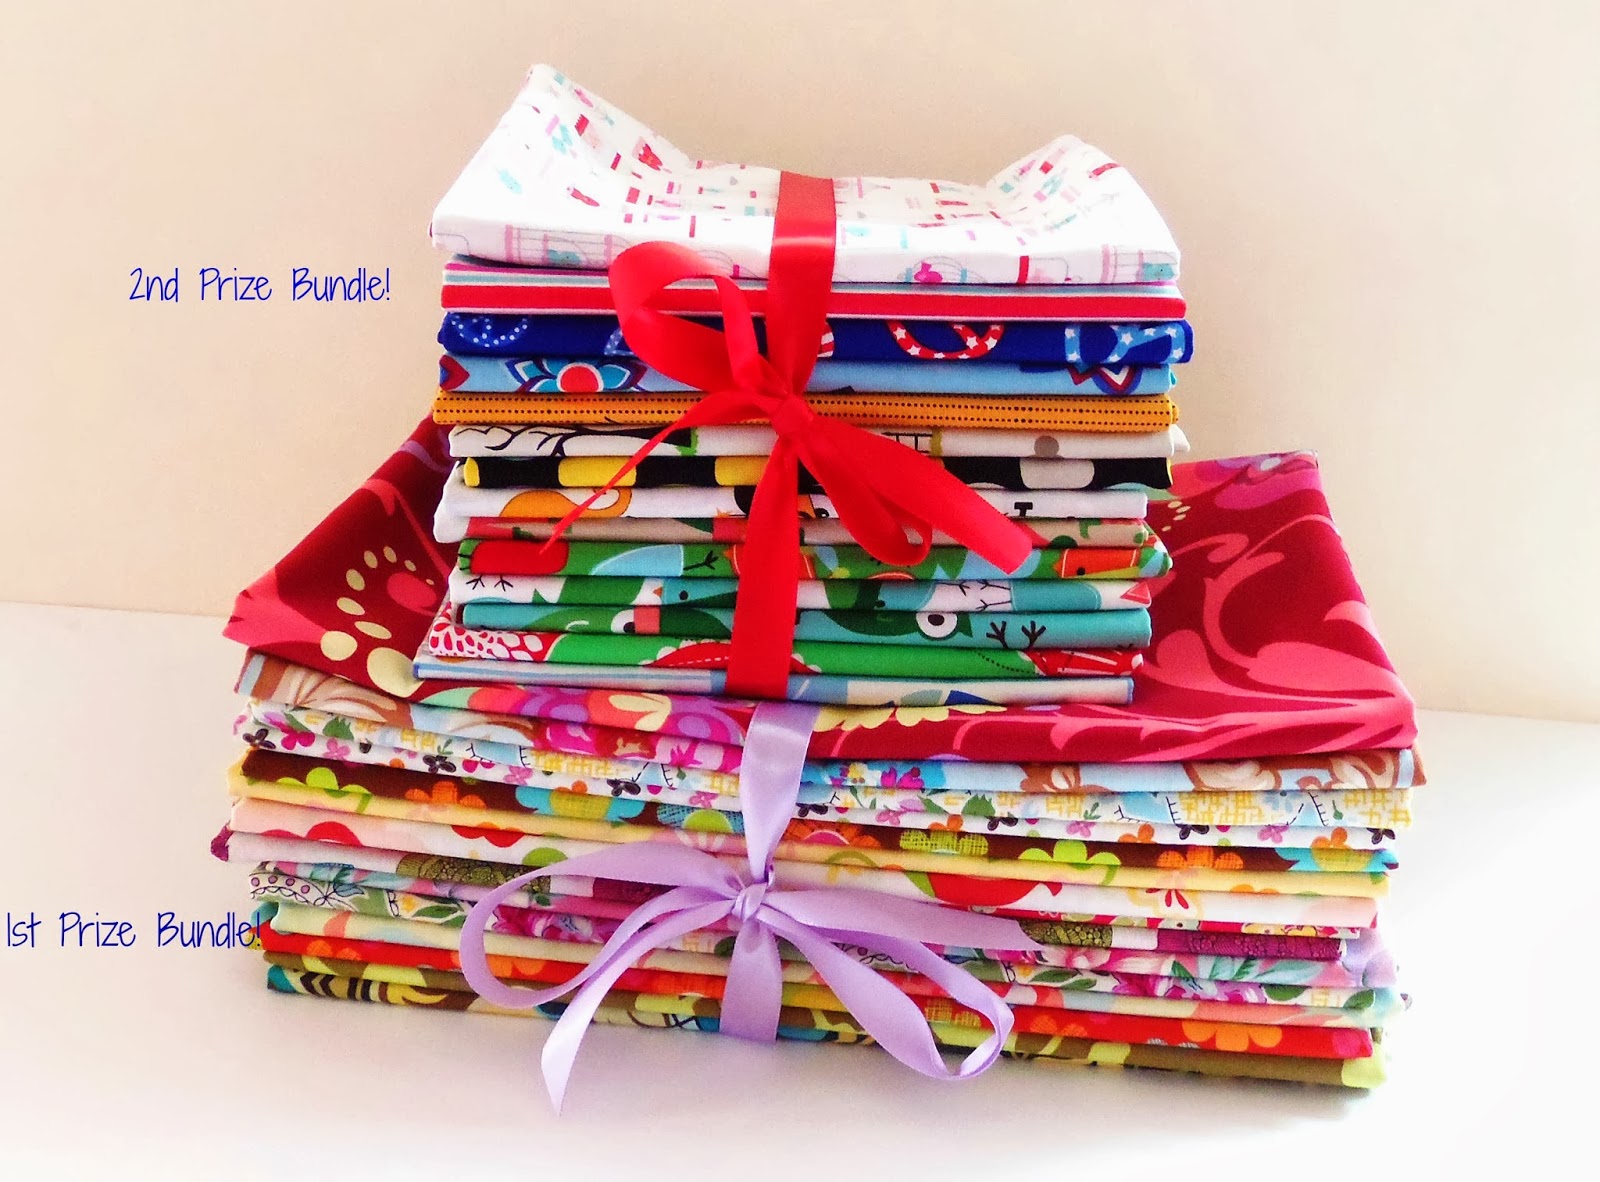
How about these prizes?
That's right!  TWO prize bundles of lovely, brand new fabrics from Hypernoodle Fabrics!

1st Prize: Open to US Residents, 15 FULL yards of lovely Florals!
2nd Prize: Open to US and International Residents, 7 yards of Holiday prints in 1/2 yd cuts!

Wowzers!

Enter now through Monday, February 10, 2014.  Make sure you follow my blog here (look over on the right side column!) before you head over to Maureen's blog~ following my blog is one of the methods of entry!  Want to know the other ways to gain additional entries?  You can enter up to FOUR times (that's 4 entries, you can triple your chances at winning if you do all 4!)
Click this link to Maureen's blog for details and get to entering!  http://www.maureencracknellhandmade.blogspot.com/2014/02/a-fabric-giveaway.html
 
Good luck, everyone!!!
♥Hypernoodle

Wednesday, January 22, 2014

New fabric lovelies now in stock ♥

 
Got a couple of lovely fabric shipments that just came in!
New from Michael Miller: La Boutique in Girl, Space Station in Retro, Motorama in Gray and Sarah Jane's Wander Woods!
Here's some pics of them paired up!


Also got in these new colors of SMALL Chevrons from Riley Blake:
Yuuummmmm!  Drooling!
Head over to the fabric website & grab some up!
(click on the link in the top of the right side bar that says "Shop Hypernoodle Fabrics")

Happy Sewing!
♥Hypernoodle

Tuesday, January 14, 2014

Tutorial ~ Subway Tile Pillow with Invisible Zipper


I love the look of Subway Tiles and decided to covert the look into a nifty pillow.  This pillow allows for easy peasy piecing ~  It's quick to make, you can whip one up in no time!  On top of that, it looks phenomenal finished and you can easily remove the pillow form to launder the pillow case!  No need for you to buy expensive commercial pillows (that everyone else has) when you can customize and make your own!

Your materials:
•5 FQ's of 5 different colored solid fabrics
•1 FQ for pillow backing (you can choose a solid or print for your pillow back)
•1 -20 inch pillow form
•1- 18 inch invisible zipper
•coordinating thread (I reccoment Aurifil 50wt thread--your seams will lay super flat and nice!) 
• and of course, your sewing machine!

*Note, I did not wash my fabrics prior to cutting/pressing.  If you do wash your fabrics, make sure to do so first.  You can still use FQ's for cutting your rectangles, but you will need a larger 5/8 yd piece of fabric for your pillow back to accommodate for shrinkage.


• Cut out our "Subway Tiles".  You will need 6 rectangles of each color.  Take your 5 solid Fat Quarters and cut 6 rectangles from each color--cut them to be 5 inches wide x 3.5 inches tall.  When you're done, you should have 30 rectangles. 

• From your Pillow backing fabric, cut out an 18"x18" square

• Layout your desired design.  You'll need 6 rows of 5 rectangles each.  You can layout your own design, or using the main pic of my subway tile pillow, follow my layout substituting your colors for mine in the same manner.

• Working from your rows, take two rectangles and lay them on top of each other with the RST (right sides together)


• Using a 1/4" seam allowance, stitch down one side of the short end (3.5" side) of the rectangle.  I've used a 1/4" foot on my machine.  It has a seam guide to make a nice 1/4" seam

• Take the two rectangles you've just sewn and open them up.  Add another rectangle on in the order of your row layout (make sure the fabrics are RST)
• continue stitching the short ends together until you have a row of 5 rectangles

• Use the same process for all your rows until you have 6 completed rows of 5 rectangles. (my pic only shows 4 rows, the last one was cut off--but you will need 5 rows) 

• Flip your rows over and press each seam open

• Make sure to PRESS using an "up and down" motion (don't iron, it may distort your seams/fabric)


 • Once you've pressed open the seams on all your rows, flip them over to the right side.  This is where your "Subway Tiles" start to take shape!
Starting with the top row and the second row, offset the second row to the MIDWAY point (the middle of the first rectangle on the second row will sit under the first seam of the top row)  


 • Alternate seams and midway points all the way across and pin or clip in place with the RST (this will require you to flip the top row on top of the second row)
Don't sweat this part! This midway-offsetting does NOT have to be super accurate, just eyeball your midway 

• Stitch along the edge you just pinned/clipped using a 1/4" seam

•  Continue adding on your rows noting the midway points.  Each row added will be offset at the beginning.


• Continue adding on your rows...

• Press open your new seams.  You can either wait until all rows are stitched together or do each one right after it is added on.  Again, make sure to PRESS using an up and down motion.

When you're done pressing seams...


Here's the back with all the seams pressed...


 and here's the front!  Now you can press and GENTLY iron this top piece.


• Now, lay your 18x18" pillow backing on top of your Subway Tile front.  

• Using the 18" square as a guide, cut your front to an 18" square.

• Again, don't sweat this part--you can line it up however you want~the "tile" effect will still come through!  I like mine a little wonky with little edges sticking out on the sides.

• Clip or pin the top and sides of the "tile" front and your back piece, RST


•Stitch along the sides and the top with a 1/4" seam allowance.  Don't stitch the bottom~leave it open.  This is where your invisible zipper will go.


•Grab you invisible zipper and flip it over.  Push open the zipper teeth on the top, separating them from the zipper tape.  Press/iron along the zipper (**Be careful not to leave your iron on the zipper teeth for too long as they may get very hot and could melt the teeth**)

•This is what your top zipper tape/teeth will look like when finished

•Push open the zipper teeth on the bottom, separating them from the zipper tape in the same manner and press/iron open


• Now take your zipper, completely open, and place it in between your front and back pillow fabrics --attach it to the back pillow fabric UPSIDE DOWN using clips.  (HINT-clips are MUCH easier for this part than pins!)  The zipper pull should be on the left side...

• Clip all the way across matching the outer edge of the zipper tape to the edge of the back pillow fabric. 

• If you have an invisible zipper foot and know how to use it, Hooray!!  Use it here!  if you don't...no worries!  You can use a regular zipper foot!  It is usually labeled with a letter "E" for most machines, but refer to the above pic if you're not sure.  If you can snap the foot to your machine's shank, do so, on the LEFT side of the zipper foot.  If the shank of your machine is different, attach your zipper foot according to the manufacturer's instructions.

• Place under your presser foot starting with the RIGHT side of the pillow.  Your zipper foot will sit atop your zipper tape.  IMPORTANT: Move your needle over to the left as close as possible to the zipper teeth


• Stitch down the zipper tape getting as close as you can to the zipper pull on the other end

• Zipper is now attached to the back pillow fabric!

• Now flip your pillow over so the back fabric is facing you, and pin/clip the zipper to the front fabric the same way you did the other side (the zipper pull should now be on the right)

• This time, you will start on the end where the zipper pull is, so scoot your zipper foot as close to the zipper pull as possible under your presser foot--Also make sure again that your needle is as close to the zipper teeth as possible.  Stitch all the way down the zipper tape 


•Now that your invisible zip is attached to both the front and back of your pillow, it's time to close the corner zipper "gaps"
Note where your zipper stitching stops on both the left and right sides of your pillow.  You can eyeball it or mark it with a pencil.

•With your zipper foot still attached, place the left bottom of the pillow under your presser foot about 1/4" - 5/8" up from your zipper stitching

• Stitch out just beyond where your zipper stitching stops

• Do the same thing on the right side of the pillow bottom (SEE PICS)

• Clip with scissors or pinking shears all 4 of your pillow corners


• Almost done!  Turn your pillow right side out...

• Voila!

• Now just scrunch your pillow form into the zippered opening (the reason why I use a pillow form that is bigger than the pillow cover is so the pillow is full, using a smaller pillow form will make your pillow look sad and droopy!)


• Now just zip 'er up!  
Notice how stitching as close to the zipper teeth as possible made the zipper disappear? Nice!


You're Finished!  Now you can easily take out the pillow form to wash the outer pillow case anytime!  Enjoy your new pillow!

Happy Sewing!
 ♥Hypernoodle


Thursday, January 2, 2014

Look What I Made! New Year, New Bags!

 
Goodness knows, I am NOT one for keeping "New Years Resolutions"...especially the sewing kind.
I'm not called: "HYPERNOODLE" for nothin'!  My overactive mind makes me horrible at sticking to pledges to "make this" or "sew that" in any constricting kind of time frame.
One thing I do know is that over the last few years, I have really, deeply, truly missed making things (especially purses/wallets and plushies)....and making things makes me HAPPY.  Being a creative person is very fulfilling when you are putting the pieces of a project together.  I don't know about you, but it gives me a "rush" that is just not comparable to many things!
My creative spark has been missing...mainly because with my second love (The Fabric Shop) I don't have time to be creative much less sew.  I've got several things I've sewn over the last year sporadically here and there that I've never even listed in my handmade Etsy shop!  I'll be getting them in there this week though!
So resolutions aside, I thought to myself..."Self, I'm not going to make a sewing resolution this year, but doing things that make me HAPPY needs to come to the front of the line", simply because I like the way making things makes me feel.
With that in mind, a couple of weeks ago, I sat down and sketched out some bag designs.  Did the math (my least favorite part--UGH!), then whipped up some new bags for the New Year!  Take a look!
Although I'd really like to keep both, the one on the left was a Christmas present for my sister.  We are both "Brit-fanatics" and I knew she'd love this Union Jack purse! 
Me, anything mod & geometric gets me goin' so I decided to make the Pink Chevron purse on the right for myself.  Both of these fabrics are available in my fabric shop right now!


Then, once I got started, I couldn't stop!  I went into my personal fabric stash and pulled this French Bull print (Windham Fabrics) out and it SPOKE to me ("Make a purse with ME" it kept saying!  LOL) and I obliged...
I was on a roll....I started drawing more ideas for bags and then sketching some super cute plushies that have been floating around in my "hypernoodle' for months!  
I looked back at these plushies I made several years ago because they always make me smile!  I sold them both and wish I would have made a second one of each!
Have you ever made something then looked back at it (many years) later and thought "OMG, I could make these SOOOOOO much better now!!!"...well, that was me looking at these plushie pics!

Purses made and sketches for new plushies drawn...my creative spark is restored.
Then....I had an epiphany....a real "A-HA" moment, if you will....what was it you ask?  Details coming verrrrrry soon!
But for now, I wanted to share these with you in hopes that your creative spark will be jump-started for your 2014 projects!
Happy Sewing! :)

Sunday, December 29, 2013

Monday Madness Fabric Sale!

 
MONDAY MADNESS is back!   
Goodbye 2013 continues with our last fabric sale of the year!  Tomorrow is our final MONDAY MADNESS of 2013!

All Day Monday, December 30th get 25% off your fabric order on our website! 
Use coupon code "2013" at checkout! No order minimum--but, for US Customers if you order 10 or more yards -US Customers get FREE SHIPPING! Yes, on top of the 25%!...No coupon required for the free US shipping!
AND---INTERNATIONAL CUSTOMERS--*Monday only*--if you order 10 or 10.5 yards of fabric you get FLAT RATE ENVELOPE PRICES AT THE US RATE for Flat Rate Envelopes ($5.50 USD). Just Select the MONDAY MADNESS shipping method at checkout with your order of 10 or 10.5 yds!
It's Monday Madness!! 


WINNER! Goodbye 2013 Give-Away!

 
Winner time!
The random name selector has spoken for the last time this year
and the winner of the GOODBYE 2013 GIVE-AWAY bundle is......
**ABBY T!  Congrats, Abby!**
Please email me at hypernoodle1 (at)gmail.com to claim your 10 yard bundle!
Thank you so much to all who entered!  Hypernoodle is geared up for some exciting changes coming in 2014~ more Give-Aways & other fun stuff to come!  
Followers, stay tuned!  
I look forward to sharing it with you all! ♥

Thursday, December 26, 2013

Goodbye 2013 Give-Away!

 
Christmas may be over, but the spirit of giving continues!
It's Hypernoodle's "GOOBYE 2013 GIVEAWAY"!
Here's your chance to win this fabulous mixer bundle:
Included in this bundle are TWENTY (that's right TWENTY) 1/2 yard cuts~ 
for a total of 10 yards!  Wheeeeee!!
All you need to do to enter is be a follower here on "The Hyper Hub" Blog!
Simply subscribe to The Hyper Hub Blog as a follower ...
You can follow/subscribe in the right hand column via Google connect (simply click on the blue Google "Join this site" link)*Thanks!
Or through networked blogs (click on the "Follow this Blog" link)
**TO ENTER THIS GIVE-AWAY, YOU MUST BE A FOLLOWER ON OUR BLOG**
YOU MAY ONLY ENTER THE GIVE-AWAY IF YOU ARE A HYPERNOODLE BLOG FOLLOWER!
Entries will be accepted Thursday night, 12-26-13 through Saturday night 12-28-13 at midnight, CST USA.
Winner will be announced on Sunday, December 29, 2013 both here on the blog and on The Hypernoodle Facebook page.
All you need to do to enter is:
•Be a Follower here on our blog (Winner will be chosen from registered followers only! Your entry will not be counted unless you are a registered blog follower)

•leave a comment on our BLOG for this post that says "I'm a Follower!" With your First name and the initial of your last name.  
For an even faster way to get your bundle if you win, please include your email address in your post so that we can easily contact you if you are the winner!


Enter now through Saturday, December 29, 2013 until MIDNIGHT(CST, USA)
any entries received after this deadline will not be counted in the final drawing.  Entries received of those who are not followers on our blog will also not be counted in the final drawing.  Entries received that do not post the correct comment will also not be counted in the final drawing.

•All entries will be entered into a random name selector online to select the winner
•Winner will be chosen and announced Sunday, 12-29-13
•Screen shot of the selected winner's name will be posted here on the blog
•Retail value of prize with shipping is $95.00 USD, ~prize is for the pictured bundle and shipping only to the winner~ prize will only be the fabric bundle pictured above plus shipping. No cash, cash equivalent or trade in value will be given by Hypernoodle Fabrics to the winner~
•Hypernoodle Fabrics cannot be held responsible for entrants who do not read and recognize the above terns of the Give-Away~by entering this Give-Away, you acknowledge that you have read and understand the above terms.

****AS ALWAYS-FRIENDLY REMINDER-- MAKE SURE IF YOU ENTER THE GIVE-AWAY TO PLEASE CHECK BACK ON SUNDAY, DECEMBER 29th-- EITHER HERE OR ON FACEBOOK TO SEE IF YOU'VE WON & IF SO, TO CLAIM YOUR PRIZE!!~

Good luck! ☺
© The Hyper Hub. Powered by